Post by JACK-2 on Dec 31, 2015 3:14:45 GMT -5
One of the best ways to improving your health is being conscientious about your diet. Which is why learning to cook is something imo that is really helpful. The Japanese like many other fields have taken self made lunch boxes and turned them into an art. These lunch boxes or bento's are easy to make and much better of in the long run:

Many of Just One Cookbook readers have asked me to write a post about how to make bento since last year. I was hesitant at first because bento making is not something I specialized in, and there are so many great bento blogs out there that feature elaborate bentos that I wish to have for my lunch.
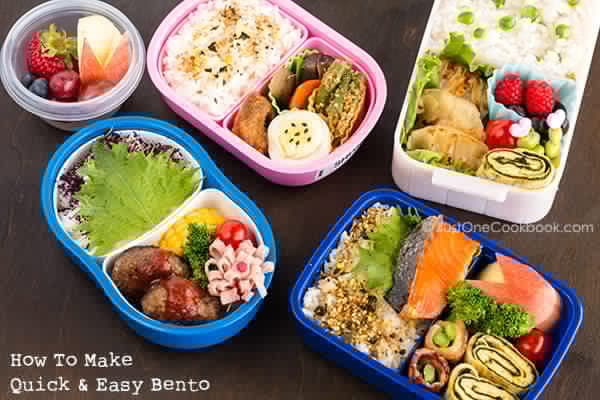
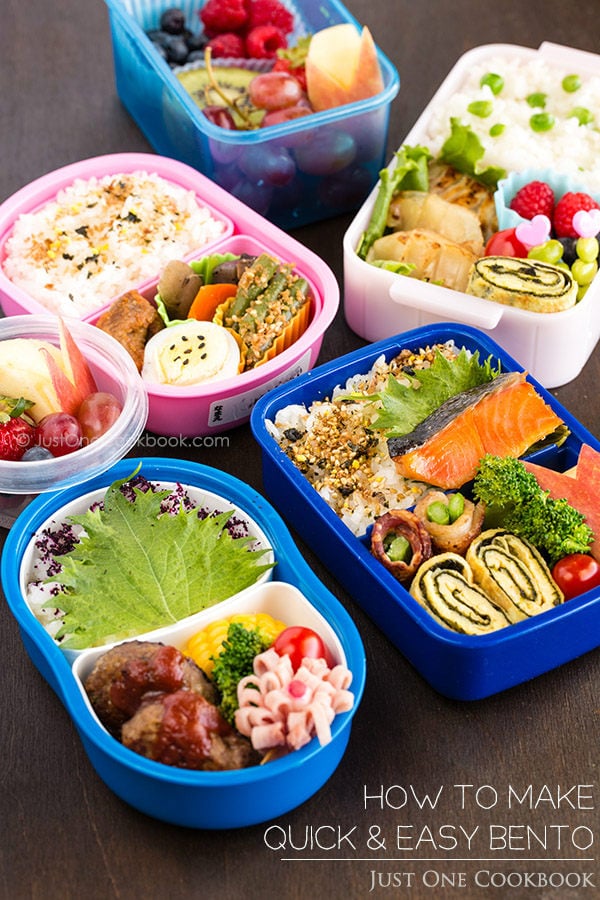
However, I continue to receive requests from readers so I’ve decided to share how I make everyday bentos (not a fancy one!) for my children.
I also included my very first video in this post!

I grew up eating mom’s homemade bento in school, and I even help packed my brother’s and my own bento in the morning with my mom when I was in high school (I was actually a morning person decades ago). My mom taught me the basic bento rule of thumb and I still follow the same guideline, which I will show you in this post.
For your information, I make bentos that can be all consumed in 10 minutes by my 5 year old daughter and 7 year old son.
This bento post is just to show you some ideas and tips that may be helpful for you to pack homemade lunches in bento box. Food does NOT have to be Japanese food. You can pack your own meals in bento box based on the guidelines below. Also, please adjust your bento box size and amount of food you put according to your needs.
Now let’s begin!
What You Need
Bento Box (Lunch Box)
It doesn’t have to be a Japanese bento box. You will need some sort of container or lunch box to put your food in. I use thermal lunch boxes for warm food like pasta and grilled cheese sandwiches. I also find it convenient when an ice pack is already attached to the bento box lid to keep food safe (read more about food safety tips for bento here).

Silicon Baking Cups and Dividers
The cups are great for keeping wet things away from dry things and holding loose items like blueberries in one place. The dividers help separating one food from the other, without mixing up the flavors.
Usually silicone cups and dividers come in bright and cheerful colors which improves the presentation for bento. They are reusable and come in many different sizes and colors. You can also use edible separators such lettuce, shiso leaves, cucumber slices, etc.

Colorful picks and Sauce containers
The picks come in many shapes, patterns, and colors and some picks are really playful and cute (like my little panda picks below)! They are helpful to put small foods together (like meatballs and berries) and also add extra color to your bento. Children are more likely to become interested in eating foods with those picks. The sauce containers helps you store the sauce separately so that the food will stay dry until the lunch time. It’s not so pleasant when the sauce end up getting mixed up with foods it’s not meant for.

Bento Rule of Thumb
Now that you have a bento box ready, let’s go over the basic rule of thumb on bento making!

Rule 1: Divide the Meal Proportionally
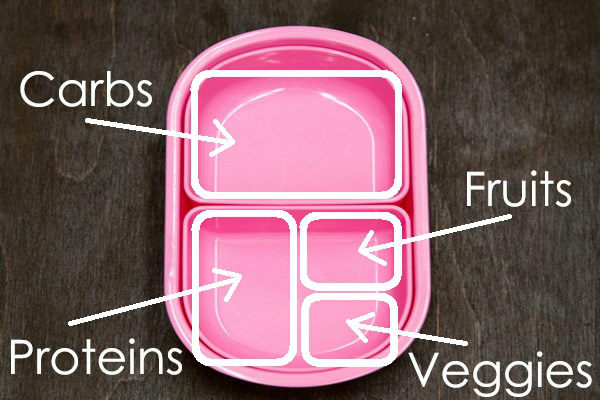
Dividing the meal proportionally will help you assemble a nutritiously balanced meal. It should at least have 4 types of food: carbs (carbohydrates), proteins, vegetables, and fruits. Be conscious about what types of foods to put in bento box when you are packing lunch.
My children’s bento ratio is 4 : 2 : 1 : 1 (4 parts carbs : 2 parts protein : 1 part vegetables : 1 part fruits). I sometimes pack 2 parts of veggies inside the bento (skip fruit section) and prepare a separate container just for fruits.

Rule 2: Keep in Mind to Add Colors
When making choices of which foods to include in the bento box, choose bold colors to provide visual impact. Not only do colorful vegetables and fruits add beautiful colors, but they are often the healthiest.

Red: tomato, carrot, red radish, bell pepper, apple, grapes, strawberries, plum, raspberries, nectarines, etc.
Yellow & Orange: corn, sweet potatoes, pumpkin, bell pepper, orange, lemon, banana, etc
Green: lettuce, cucumber, green onion, edamame, broccoli, spinach, okra, shiso, snap peas, asparagus, parsley, bok choy, green beans, Brussels sprouts, green peas, kiwi, etc
White: daikon radish, potato, onion, lotus root, enoki mushroom, white sesame seeds
Black & Brown: blueberries, shiitake mushroom, gobo (burdock root), wakame (dried seaweed), nori (dried seaweed sheet), hijiki (dried seaweed), black sesame seeds, etc.
If I have similarly colored dishes like broccoli and asparagus, I separate them and put other foods in between to make the bento more visually appealing. Sprinkling colorful furikake (rice seasonings) or garnishing with chopped parsley and green onion gives nice accents to overall presentation.
How To Make Bento お弁当の作り方

Many of Just One Cookbook readers have asked me to write a post about how to make bento since last year. I was hesitant at first because bento making is not something I specialized in, and there are so many great bento blogs out there that feature elaborate bentos that I wish to have for my lunch.
However, I continue to receive requests from readers so I’ve decided to share how I make everyday bentos (not a fancy one!) for my children.
I also included my very first video in this post!


I grew up eating mom’s homemade bento in school, and I even help packed my brother’s and my own bento in the morning with my mom when I was in high school (I was actually a morning person decades ago). My mom taught me the basic bento rule of thumb and I still follow the same guideline, which I will show you in this post.
For your information, I make bentos that can be all consumed in 10 minutes by my 5 year old daughter and 7 year old son.
This bento post is just to show you some ideas and tips that may be helpful for you to pack homemade lunches in bento box. Food does NOT have to be Japanese food. You can pack your own meals in bento box based on the guidelines below. Also, please adjust your bento box size and amount of food you put according to your needs.
Now let’s begin!
What You Need
Bento Box (Lunch Box)
It doesn’t have to be a Japanese bento box. You will need some sort of container or lunch box to put your food in. I use thermal lunch boxes for warm food like pasta and grilled cheese sandwiches. I also find it convenient when an ice pack is already attached to the bento box lid to keep food safe (read more about food safety tips for bento here).

Silicon Baking Cups and Dividers
The cups are great for keeping wet things away from dry things and holding loose items like blueberries in one place. The dividers help separating one food from the other, without mixing up the flavors.
Usually silicone cups and dividers come in bright and cheerful colors which improves the presentation for bento. They are reusable and come in many different sizes and colors. You can also use edible separators such lettuce, shiso leaves, cucumber slices, etc.
Colorful picks and Sauce containers
The picks come in many shapes, patterns, and colors and some picks are really playful and cute (like my little panda picks below)! They are helpful to put small foods together (like meatballs and berries) and also add extra color to your bento. Children are more likely to become interested in eating foods with those picks. The sauce containers helps you store the sauce separately so that the food will stay dry until the lunch time. It’s not so pleasant when the sauce end up getting mixed up with foods it’s not meant for.

Bento Rule of Thumb
Now that you have a bento box ready, let’s go over the basic rule of thumb on bento making!

Rule 1: Divide the Meal Proportionally
Dividing the meal proportionally will help you assemble a nutritiously balanced meal. It should at least have 4 types of food: carbs (carbohydrates), proteins, vegetables, and fruits. Be conscious about what types of foods to put in bento box when you are packing lunch.
My children’s bento ratio is 4 : 2 : 1 : 1 (4 parts carbs : 2 parts protein : 1 part vegetables : 1 part fruits). I sometimes pack 2 parts of veggies inside the bento (skip fruit section) and prepare a separate container just for fruits.

Rule 2: Keep in Mind to Add Colors
When making choices of which foods to include in the bento box, choose bold colors to provide visual impact. Not only do colorful vegetables and fruits add beautiful colors, but they are often the healthiest.

Red: tomato, carrot, red radish, bell pepper, apple, grapes, strawberries, plum, raspberries, nectarines, etc.
Yellow & Orange: corn, sweet potatoes, pumpkin, bell pepper, orange, lemon, banana, etc
Green: lettuce, cucumber, green onion, edamame, broccoli, spinach, okra, shiso, snap peas, asparagus, parsley, bok choy, green beans, Brussels sprouts, green peas, kiwi, etc
White: daikon radish, potato, onion, lotus root, enoki mushroom, white sesame seeds
Black & Brown: blueberries, shiitake mushroom, gobo (burdock root), wakame (dried seaweed), nori (dried seaweed sheet), hijiki (dried seaweed), black sesame seeds, etc.
If I have similarly colored dishes like broccoli and asparagus, I separate them and put other foods in between to make the bento more visually appealing. Sprinkling colorful furikake (rice seasonings) or garnishing with chopped parsley and green onion gives nice accents to overall presentation.


